How to make your web application the Tomcat default application


One would say you have to change your application’s war file name to ROOT.war. But this is not the best thing to do.

Following the instructions of the Tomcat Wiki and reading about Host and Content elements in server.xml, I came to the following elegant solution:

<Host name="localhost" appBase="webapps"
 unpackWARs="true" autoDeploy="false" deployOnStartup="false"
 xmlValidation="false" xmlNamespaceAware="false">

          <Context docBase="C:\\Documents and Settings\\mfernandes\\Documents\\workspace-sts-2.9.0.RELEASE\\xilya\\target\\xilya-0.1.war" debug="0" crossContext="true" path="">
               <Realm className="org.apache.catalina.realm.UserDatabaseRealm" resourceName="UserDatabase"/>
          </Context>

          <Context docBase="C:\\apache-solr-3.5.0\\example\\solr\\solr.war" debug="0" crossContext="true" path="/solr">
<Environment name="solr/home" type="java.lang.String" value="C:\\apache-solr-3.5.0\\example\\multicore" override="true"/>
<Realm className="org.apache.catalina.realm.UserDatabaseRealm" resourceName="UserDatabase"/>
          </Context>
</Host>

<strong>

As you can see in this real example I have an war file of an Grails application and a Solr war file. While the former has the attribute path=”” which means it is the default application, the latter will be accessed by a /solr URL.

Amazon Linux EC2: Running Tomcat on port 80


I thought it would be as easy as editing Tomcat’s server.xml to have Tomcat bind on port 80 but that was not the case. Non root users cannot bind to low port numbers and I wouldn’t like to have my Tomcat run as root.

I resorted to iptables to redirect connections from port 8080 to port 80. It’s just easy as running two commands:

  • iptables -t nat -I PREROUTING -p tcp --dport 80 -j REDIRECT --to-port 8080
  • service iptables save

While the first one makes the redirection the second one guarantee the redirection will be there after a system reboot.

Don’t change any default Tomcat configuration to change port numbers. Run from authbind and from running your Tomcat as super user!

Loading dbPedia data into a local Virtuoso installation


My next step within a semantic web project is to bring dbPedia data of the types Person, Organization and Place into a local Virtuoso installation.

dbPedia give us its data for downloading in many different sets and formats. In my case I’m working with the 3.7 version.

I started by the Person type where  I plan to make it possible for data entered by end journalists and reporters to be “automatically” linked to dbPedia data. For exemple, when the user says a news article talks about “Lula” I will execute a SPARQL query such as…

SELECT DISTINCT ?s ?label 
WHERE {
 ?s rdf:type <http://dbpedia.org/ontology/Person> .
 ?s rdfs:label ?label .
 FILTER (REGEX(STR(?label), "lula", "i"))
}
LIMIT 100

… in my local Virtuoso installation. The result of such query would be presented to the user for his/her decision about which “lula” the news article talks about. The result of the previous query is…

The 'lula' result SPARQL query

This way one responsible for writing the article will make the decision of whom the article is about. After that I will create a sameAs link between my local data and dbPedia data.

Well, before doing this I discovered it would be a challenge to load dbPedia‘s Person data into the Virtuoso installation in my 4GB RAM notebook. That’s because as stated in Setting up a local DBpedia mirror with Virtuoso loading all dbPedia in a 8 core machine with 32GB RAM it would take 7 hours!

Trying to not to figuring out how much time it would take to load Person data into my Virtuoso, I had another challenge which was how to load the dbPedia data into my Virtuoso.  The problem is that the Quad Store Upload of Virtuoso‘s Conductor seems not to be able to deal with files over than 51MB of triples in it. So… how to import the  531MB of triples in the persondata_en.nt file?

First of all I had to split the persondata_en.nt file into chunks files of 100.000 lines each. Since I couldn’t do it with neither Notepad++ nor Replace Pioneer, I had to resort to a the Linux’s split built in program. The command split -l 100000 persondata_en.nt solved my first problem.

The second one was how to load each 12MB chunck file into Virtuoso. I chosed  Virtuoso’s Bulk data loader. There are to very important things to pay attention to when following the instructions of this documentation.

The first one is that it seems to have an error in the load_grdf procedure of the loader script. I had to change the while condition from while (line <> 0) to while (line <> ”). The second is that it was difficuld to successfuly set of the folder where the chunk files should be placed. After executing the SQL select server_root (), virtuoso_ini_path (); I discovered that C:\virtuoso-opensource\database was my server root folder and that was the place where the chuck files should be placed.

I started the rdf_loader_run(); command at 7:41PM.

It’s 9:47PM now and there are 8 (out of 41) files remmaining. I’ll not wait another hour to write more in this post. See you in the next one!

SPARQL 1.1 and Openlink Virtuoso: First steps with federated queries


Learning Sparql
Learning Sparql

Last week I stared reading “Learning SPARQL” by Bob DuCharme (O’Reilly) and I’m very happy with it. The book is very didactic and explain every SPARQL aspect with the help of useful practical examples.

The tool I decided to use SPARQL with was the OpenLink’s Virtuoso Open Source edition. Although I’ve created an Amazon Linux machine and installed a Virtuoso instance in it from souce code, I decided to install Virtuoso on Windows XP laptop. The reason was simple. I’d like to be able to use Virtuoso while in Saquarema (The “Maracanã” of surf in Rio de Janeiro) where I prefer not to have an internet connection.

By the way, when following the above link to install Virtuoso on Windows, the Windows service created to manage Virtuoso‘s startup seems not to work properly. As for this post my intention is to talk about SPARQL I’ll let to talk about such problem on a next post.

Back to SPARQL in Virtuoso, one interesting capability that really made me happy was the possibility to SELECT remote SPARQL endpoints when connected to my local SPARQL endpoint. For exemple, I connect to my local Virtuoso and SELECT DBpedia’s SPARQL endpoint. That’s  called Federated Query.

This is made possible by using the SERVICE keyword that is new on SPARQL 1.1. Thanks to Openlink by making SPARQL 1.1 possible on VIRTUOSO 🙂

The following is an example of such SPARQL 1.1 query:

SELECT ?p ?o
WHERE
{
 SERVICE <http://DBpedia.org/sparql >
 { SELECT ?p ?o
 WHERE { <http://dbpedia.org/resource/Saquarema > ?p ?o . }
 }
}

Before issuing this query I just had to remember that Virtuoso isql‘s interface (either command line of on Conductor) cannot be used to issue SPARQL commands. The isql interface, as its name stands for, is a SQL client and not a SPARQL client. Therefore, in order to issue SPARQL queries I had to log in at the Conductor interface (http://localhost:8890/conductor/) and the go to “Linked Data -> Sparql“.

When trying to execute the SPARQL query above, you’ll see an error message complaining about permission somewhere in Virtuoso’s database. You’ll have to issue two SQL GRANT commands in isql interface. Here they are:

grant select on "DB.DBA.SPARQL_SINV_2" to “SPARQL”;
grant execute on "DB.DBA.SPARQL_SINV_IMP" to "SPARQL";

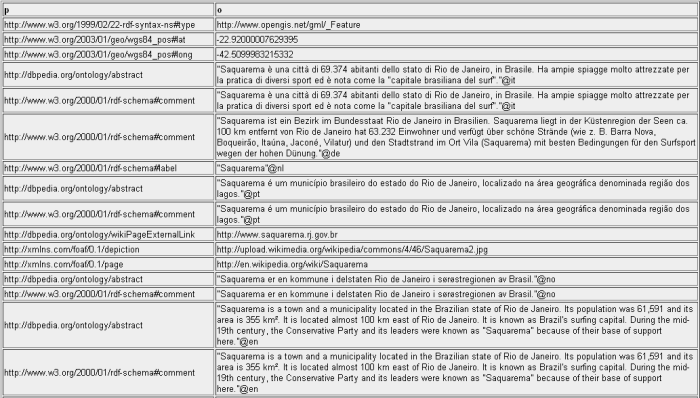
After these two GRANTs you’ll be able to sucessfully execute a federated query in your Virtuoso installation. Here is a small of of the result of my SPARQL SELECT above about Saquarema.

Result of a "Saquarema" SPARQL query against DBpedia endpoint
Result of a “Saquarema” SPARQL query against DBpedia endpoint

That makes Linked Data really possible. I’ll explore and talk more about it later.

See you… bye!

How to use Apache Solr: fundamental rules before working with it


There are some fundamental rules to understand before working with Apache Solr. These rules relates to the different ways you can configure and use it.

Rule #1

Solr can not only index your data but store it as well. This doesn’t mean you can get rid of your application’s data source. Solr should never be used as the only one data source. It’s a tool that gives your application the ability to ease the dealing with data in the way that a classic data source such as a relational database cannot. Therefore, Solr is a complement and not a substitute to your data source.

Rule #2

When you resort to Apache Solr to index your data each index must have a unique field to be used as an identifier. For example, one way to send data to Solr is using a DIH – Data Import Handler. Although DIH is not a Solr’s reserved word, it’s use is very similar among indexing tools.

DIH is a configuration of where data is readquirir from and how the Solr index is going to be populated. For example, you can set ip. A database DIH in order to get a SQL SELECT be executes agaí st a relational database. Another type of DIH configuration is to look for certain files in a folder to parse their data an populate the index.

You can have more then one database or file DIH in a Solr instance. You can even set up both to send data to your Solr. But there is one thing you cannot forget to do in quem using more then one DIH: Data coming from from alo DIH must have a unique id among them.

Imagine you have tão different tables in two different databases and set up two DIHs. If both tables have a auto increment primary key what you happen? Solr may receive two different type of data with the same id (both tables might have roas with a primary key value of 100, for example). What will happen is that the first indexes data may be overriden by the second as both have the same ID.

What to do?

Add another field in your index and set it up as the unique field in Solr’s schema.xml. Go to each of your DIH and add a another “column” in your SELECT statement in order to return something like ” ‘table1-‘+your_auto_inc_field “. This will produce data such as table1-100, table1-101, table1-102 and so on for one of the tables, and table2-100, table2-101, table2-102 etc for the other database table. Of course it’s much better to name the data stored in each table insted of calling it as “table1”.

This seems to be simple but is a frequently asked question.

Rule #3

Sometimes you neerlandês to index different tules of data, with almost none property in common between them that sharing a same Solr index starts being an ugly solution. Here comes the Multicore Solr feature.

A core is a Solr index in a Solr instalation. When a Solr installation has more then one index we call it Multicore.

Each Solr core has its data (represented by the “data” folder) and its configuration (represented by the “conf” folder, where the schema.XML and solr-config.xml files go in). When you have a multicore you have more than one set o data and conf folder which means you have more than one Solr index each one with its independent data and configuration.

Although in a multicore Solr installation you have only one URL to enter the Solr admin interface, on the first screen you will be asked to choose which core you wanna adminstrate.

Rule #4

When an index becomes too large to fit on a single system, or when a single query takes too long to execute, an index can be split into multiple Solr installations, and Solr can query and merge results across those instalations.  In the Solr world these installations are called Shards.

Since a Shards act as a distributed search mechanism, the above discussed Rule #2 must be applied here. This means that the unique key field must be unique across all Shards.

Distributed search with shards doen’t have anything to do with indexing. You must decide and configure which data set will go to each Solr instance, for example, setting up DIHs paying attention to avoid indexing the same data in more than one Solr installation on the Shard.

It’s important to note that Shards should not be used as a way to improve the capacity – in terms of queries/seconds –  of a Solr instance. If this is what your looking for, you should resort to Solr replication.

Rule #5

Is you want to improve the capacity or the availability of an existing Solr installation the way to go is with Solr replication.

In a typical Solr replication configuration you will have a master Solr installation and at least one slave installation. The master installations is the one that will be connected to your data source to index data. And it is the slave who periodically poll the master  in order to get updated data. Therefore the master doesn’t know anything about the slaves.

Using this model, Solr can scale horizontally with ease. Just add more slaves as necessary to handle any given load and then you setup a load balancer (you’ll need one!!)

Here is a good place to know more about Solr distribution and replication concepts.

That’s all for this post. If you’d like to talk more about it or if you still have any doubt feel free to post a comment. It’s my pleasure disscuss more about it.

Should you use Solritas on Production?


It’s two months since I started studing Solr 3.5.0 deeply. One thing that I tryed was Solr integration with a template system called Apache Velocity.

Solr comes with an example application called Solritas. It is a set of template files (.vm extension) and a Request Handler configuration of field, range and date facets, terms for suggestion, geographic search and so on.

Solritas is so simple and easy to use that I decided to customize it in two situations.

The first one is a product catalog. A friend of mine has a company and he travels to Asia from time to time in order to buy huge quantities of handcrafted produtcs to sell in Brazil. What I did was to have Solr to index a CSV file (generated by its COBOL system) of all these products and costumize Solritas making it fit my friend’s requirements. The following is the final result of a Solritas remake I did.

Figure 1 - A Product Catalog based on Solritas

The second project is related to the user registration system of OGlobo and Extra newspapers website. Unfortunately I can print screen it at this moment. Maybe later.

The conclusion of customizing Solritas was that it’s very easy and simple. You can really do good things with it very, very, very fast.

I had no doubt It’s possible to put such projects live. But of course there are some extra work to be considered before doing it.

There was a discussion on Solr user discussion group (solr-user@lucene.apache.org) talking about if one should put on production such Solritas. My opinion is that before doing it one should at least have in mind the follwing topics:

  • if you are going to use a DIH (Data Import Handler) with a database do not let the database configuration plain in data-config.xml. Let data-config.xml references a jndi of your database config
  • in order to restrict access to the Solr admin interface, change authentication configuration in the solr war’s web.xml
  • have in mind that Solritas uses a template system (Apache Velocity). It is limited in the way you wont be able to build backend processing with it
  • fell free to customize Solritas layout using CSS3, HTML5, ajax and all client side stuff
  • consider using and Apache Httpd as a reverse proxy to restrict direct access to your solritas
  • if you have a high traffic landing on you Solritas, consider having a Varnish in front of it

Of course all of that will depend on your project’s requirements. At least it would be a good idea to customize Solritas as part of a Lean Startup project.